Set Up Initial PROFINET Device Connection
This topic describes how to set up the default configuration for a PROFINET device within the TIA portal. This task is considered as a first step in a configuration process because it validates the connection between the TIA portal and the PROFINET device and enables users to do further configuration steps.
Prerequisites
Please make sure that the following prerequisites are met before you start with the configuration:
A PROFINET-capable PLC (IO-Controller) and a PROFINET device (IO-Device), both powered on.
A physical Ethernet connection between the engineering PC, the PLC, and the PROFINET device.
The TIA Portal software installed, supporting the used PLC and PROFINET device.
Basic knowledge of the TIA Portal and PROFINET device configuration.
The required GSDML file for integrating the PROFINET device into the TIA portal.
Installing the GSDML File
Note
The GSDML files are available in two languages at www.balluff.com.
The PROFINET device data required for project planning is stored in Generic Station Description Markup Language (GSDML) files. The data modules of a network module are displayed in the project planning software itemized by subslots.
The GSDML file provides the possible data modules (input or output of different data widths). To configure the network modules, the corresponding data modules are assigned to a subslot.
Note
Outdated GSDML versions may not be compatible with the latest FW version.
In order to assign the data modules to subslots, you need to install the GSDML file of the PROFINET device. You can install the GSDML file in TIA Portal with the project open or not.
Before you begin
Make sure that:
The GSDML file of the PROFINET device is available on your engineering PC.
Steps
To install the GSDML file in TIA Portal:
Extract the GSDML file into a separate directory on your hard disk.
Open the GSD management.
In the toolbar, select Options > Manage general station description file (GSD).
⇒ The Manage general station description files dialog opens.
Select the GSDML file.
Under Source path:, navigate to the folder containing the GSDML file.
⇒ The GSDML file is displayed in the Content of imported path table.
Install the GSDML file.
Activate the checkbox for the GSDML file and click Install.
⇒ The GSDML file is installed. The progress is displayed. Once finished, the successful installation is confirmed.
Click Close to leave the Manage general station description files dialog.
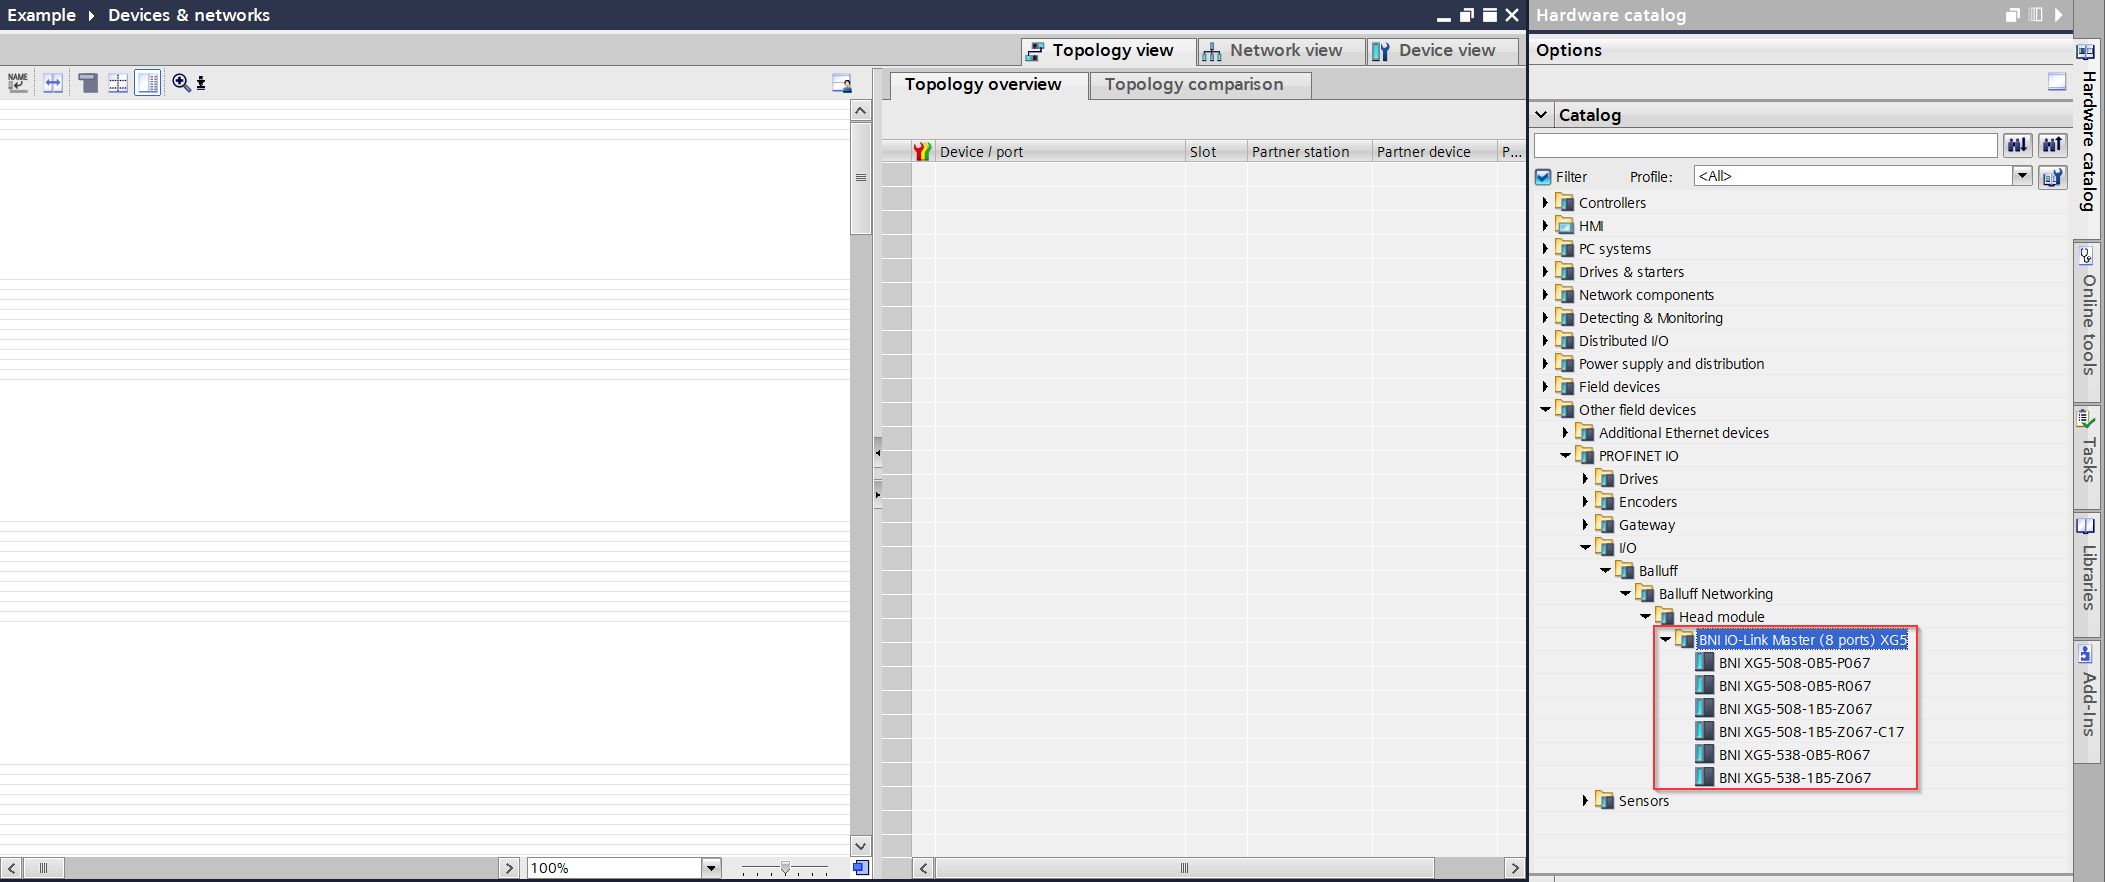
⇒ The Hardware catalog is updated and the PROFINET device is available under Other field devices > PROFINET IO > IO. The PROFINET device is now ready for further configuration.
Adding the PROFINET Device to the Project
Add the PROFINET device to the TIA Portal project and connect it to the PLC.
Before you begin
Make sure that:
The TIA Portal project and the PLC are set up accordingly for PROFINET.
The GSDML file of the PROFINET device has been installed.
Steps
To add the PROFINET device to the project in TIA Portal:
Open the Network view.
Open the Hardware catalog.
Place the PROFINET device.
Select the PROFINET device, keep the left mouse button pressed, drag the PROFINET device to the Network view, and drop it to place it.
Draw the network connection between the PROFINET device and the PLC via drag and drop.
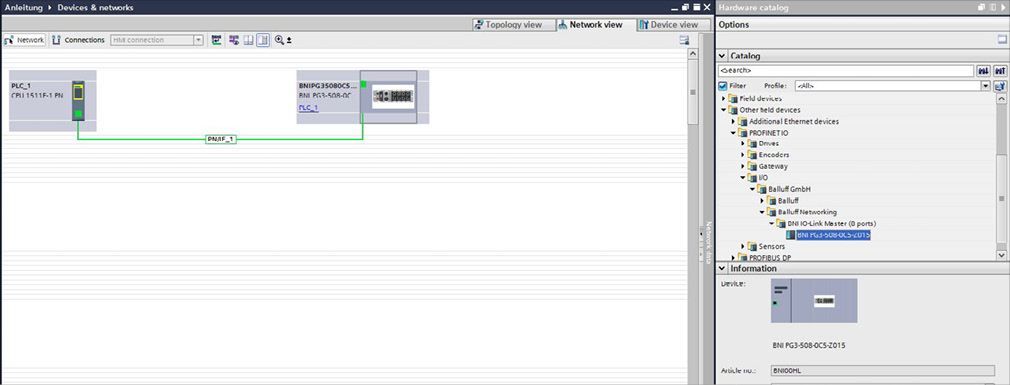
⇒ The PROFINET device is added to the topology and connected to the PLC via PROFINET.
Assigning a PROFINET Device Name and IP Address
All PROFINET devices are addressed in PROFINET via a unique PROFINET device name and IP address.
Before you begin
Make sure that:
The PROFINET device has been added to the project.
Steps
To assign the PROFINET device name and IP address in TIA Portal:
In the Network view, click the PROFINET device port.
⇒ The Properties tab opens.
Click PROFINET interface [X1].
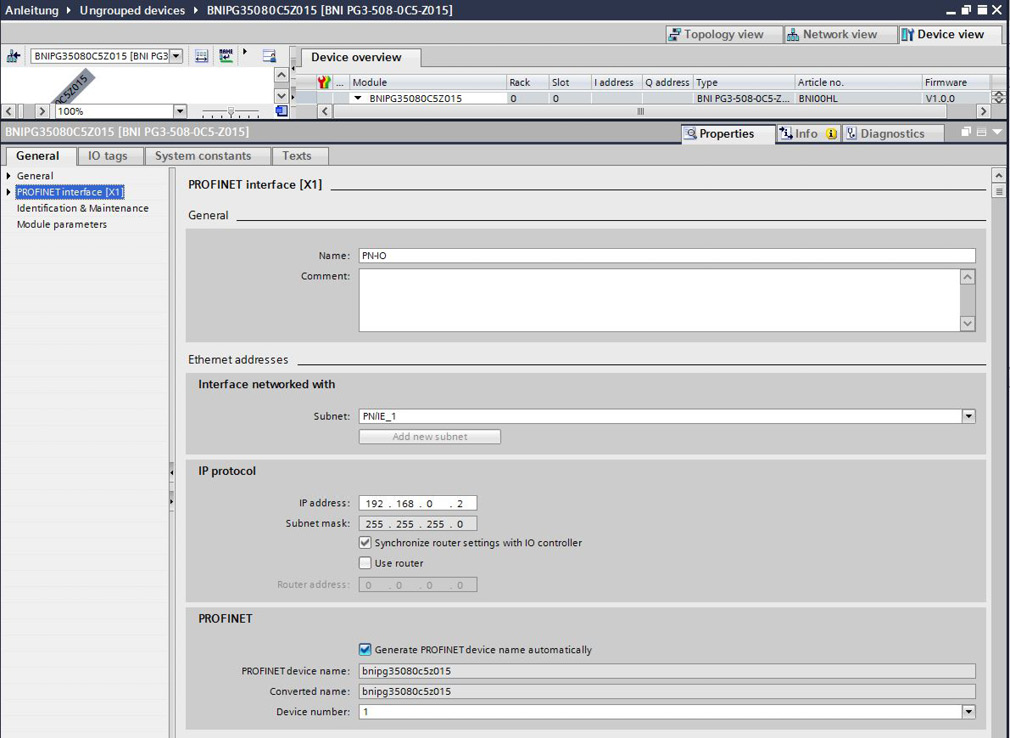
⇒ The communication parameters of the PROFINET device are displayed.
Optional: Change the default IP address.
Under IP protocol, change the default settings for the IP address.
Optional: Change the default PROFINET device name.
Under PROFINET, change the default settings for the PROFINET device name.
Establishing a PROFINET Device Connection
The PROFINET device name assigned offline must be assigned to the PROFINET device in the field.
Before you begin
Make sure that:
The PROFINET device name has been configured in the project.
The PROFINET device is connected to the engineering PC and powered on.
Steps
To assign the PROFINET device name to the PROFINET device in TIA Portal:
Open the Assign PROFINET device name dialog.
In the Device overview, right-click the PROFINET device and select Assign device name.
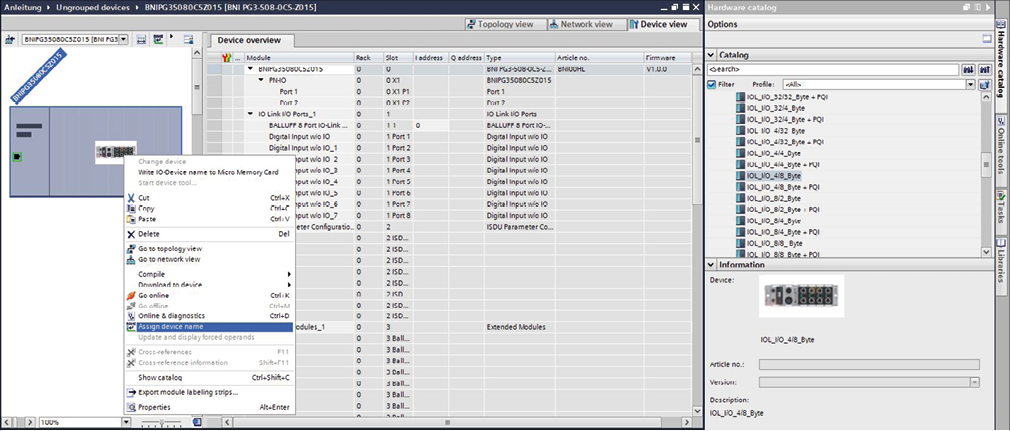
⇒ The Assign PROFINET device name dialog opens.
Select the previously assigned device name.
Under Configured PROFINET device > PROFINET device name, select the previously assigned device name.
The identification takes place via the MAC address or via the Flash LED function. This function causes the SF-LED on the module to flash three times at a frequency of 1 Hz.
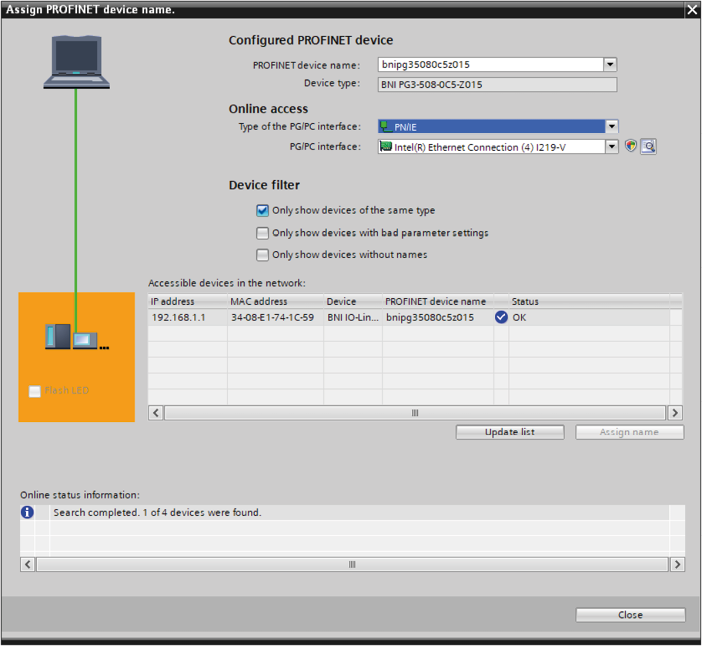
Click Update list.
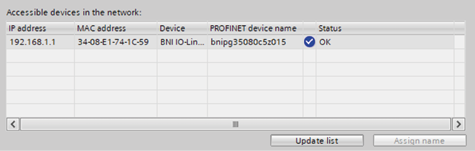
⇒ All PROFINET devices matching the PROFINET device name are displayed in the list.
Click Assign name to assign the desired PROFINET device name to the selected, found device.
Note
The PROFINET device name must match the name that was previously configured (see chapter Assigning a PROFINET Device Name and IP Address).
Testing the PROFINET Device Configuration
To test the PROFINET device connection, load the default configuration into the PROFINET device and go online in TIA Portal.
Before you begin
Make sure that:
The PROFINET device has been added to the project and has been assigned a PROFINET device name and IP address.
The PROFINET device name has been assigned to the PROFINET device in the field.
Steps
To test the PROFINET device configuration in TIA Portal:
Compile the program.
In the toolbar, click the Compile icon.
Start the download.
In the toolbar, click the Download to device icon.
The Load Preview dialog opens.
Select the appropriate actions in the dropdowns of the Load Preview dialog.
Click Load.
Confirm the following dialog by clicking Finish.
The PROFINET device configuration is loaded to the physical PROFINET device.
Go online.
In the toolbar, click the Go online icon.
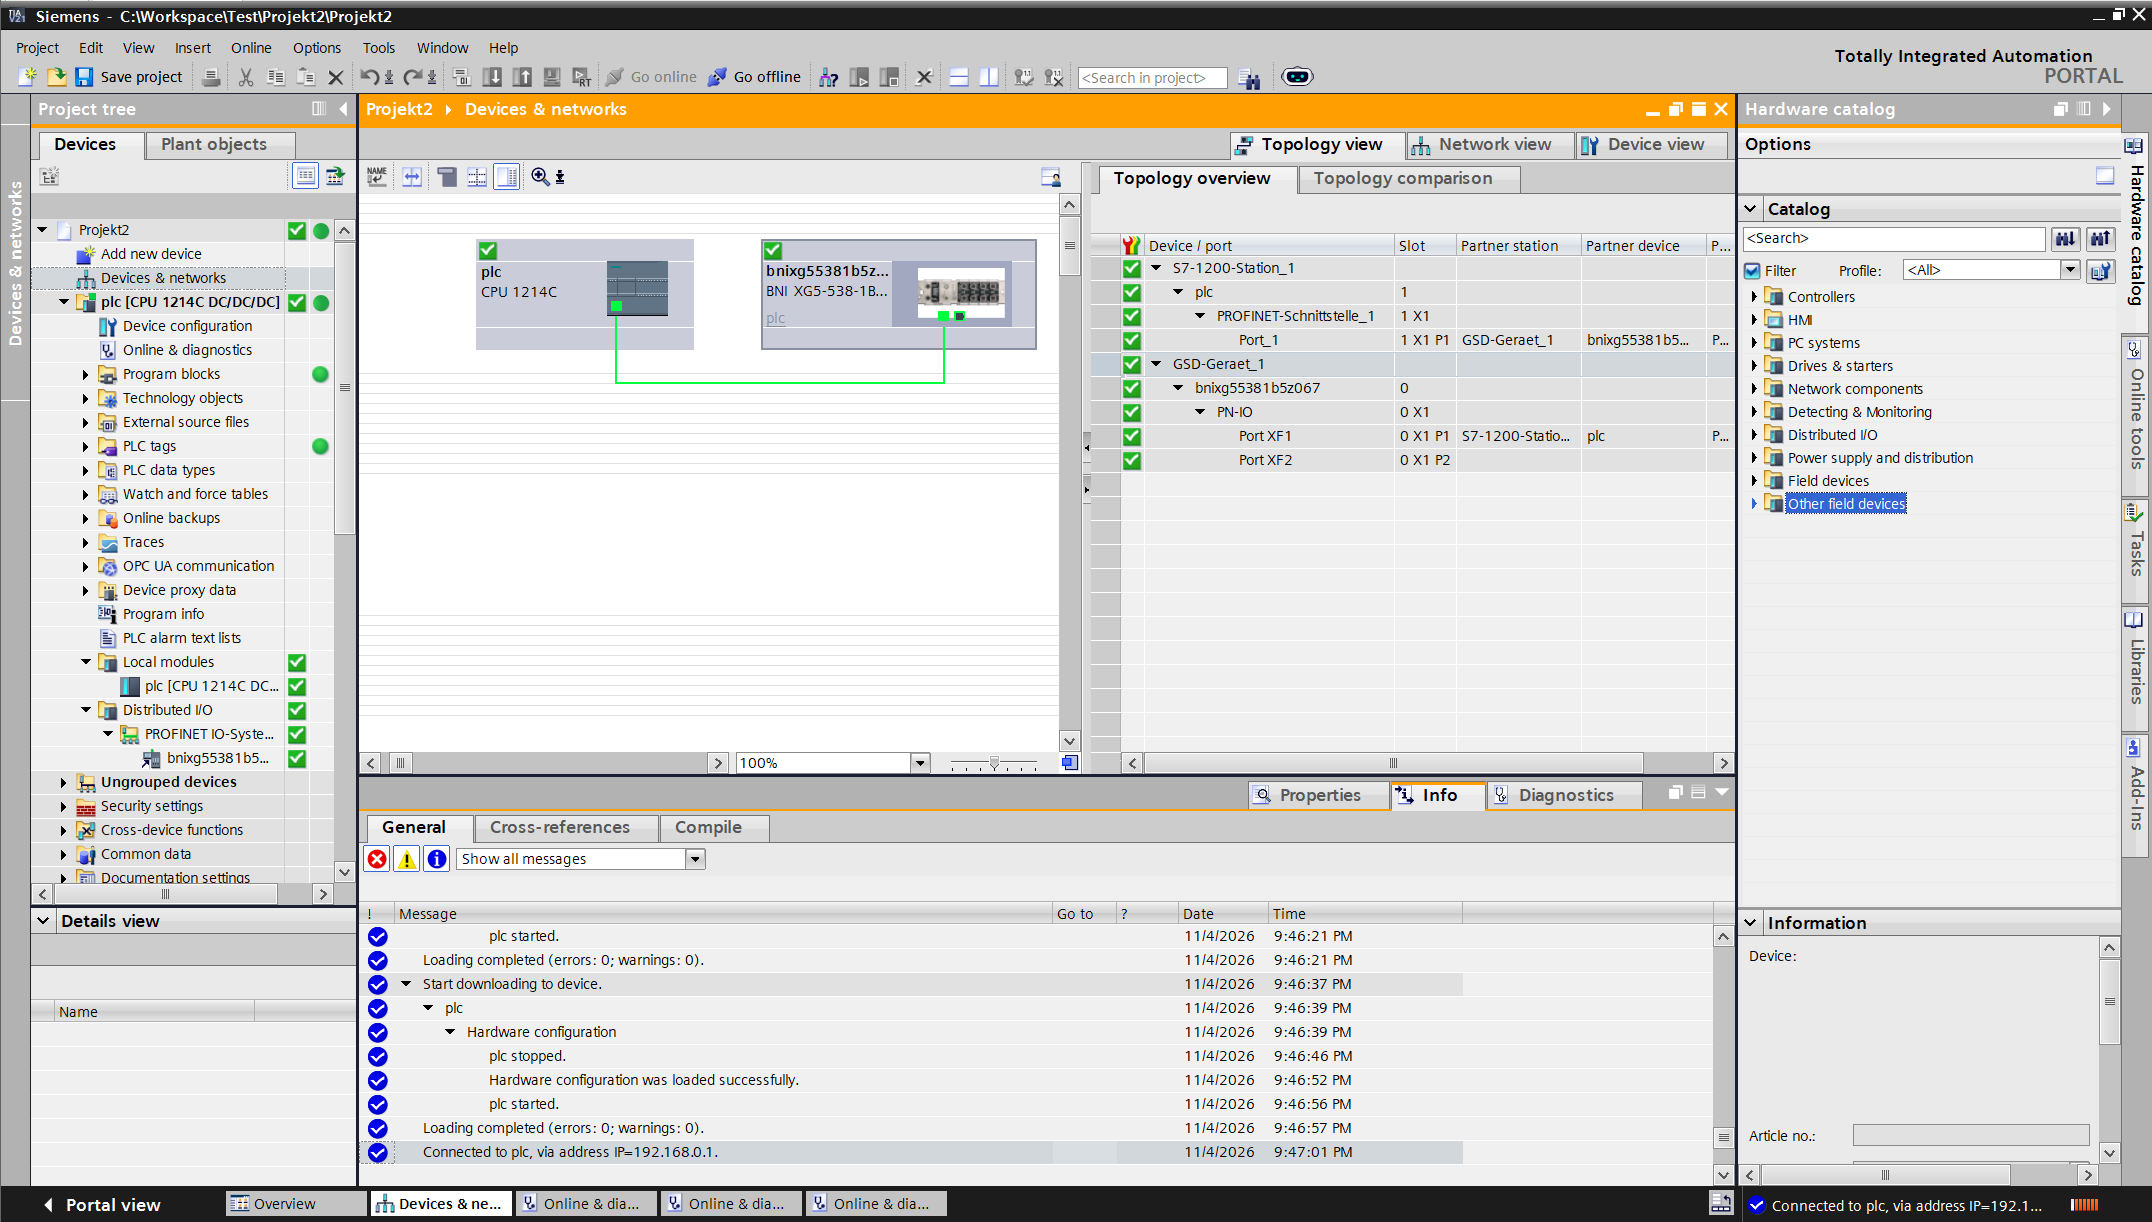
Successfully integrated PROFINET device with active communication
⇒ Green checkmarks on all devices in the topology indicate successful integration and active communication.
The device’s Web user interface is available by entering the device’s IP address in your web browser’s address bar.
Note
The bus error should be reset at the PROFINET device. If the PROFINET device continues to report a bus error, this could be because the PROFINET device relationship has not been established. The following remedies are possible:
Via Target system > Ethernet > Ethernet subscriber > Browse, scan the network and check whether the PROFINET device is reporting under the correct PROFINET device name and IP address.
If necessary, change the IP address or the PROFINET device name.
Assign the PROFINET device name to the PROFINET device again and download the configuration.