Network Configuration#
This chapter covers the frontend-independent network configuration required before connecting to the RadarImager from a client application.
It covers the following tasks:
- Configure the static IP address.
- Adjust MTU size to enable Jumbo Frames.
The network configuration examples below are shown for Windows and Linux. These settings apply independently of the frontend software you use.
Configure the static IP address#
Configure a static IPv4 address of 10.42.0.1 on the Ethernet adapter used to connect to the RadarImager.
For Windows 10#
- Open the Control Panel.
- Open the Network and Sharing Center.
- Select Change adapter settings.
- Right-click the Ethernet connection, and select Status.
- In the dialog, click Properties.
- Double-click Internet Protocol Version 4 (TCP/IPv4).
-
Select Use the following IP address, and enter the following:
IP address:
10.42.0.1Subnet mask:
255.255.255.0Default gateway:
10.42.0.1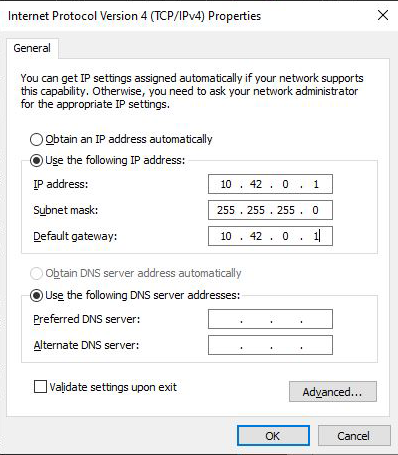
-
Click OK.
For Linux#
- Open the network settings for the wired connection, and select Manual under the IPv4 tab.
- Enter the following address, netmask, and gateway for the connection:
Address:
10.42.0.1Netmask:
255.255.255.0Gateway:
10.42.0.1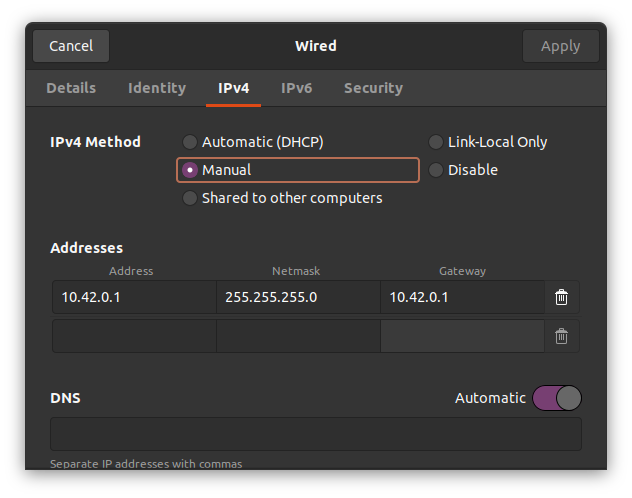
Adjust MTU size#
To use the GenDC container, the MTU size needs to be adjusted on the client side. The RadarImager is configured with an MTU size of 9014 bytes acting as the server.
MTU size
The RadarImager is tested with a MTU size of 9014 on client and server side.
Prerequisite
Ensure that all devices in your network support Jumbo Frames before enabling this setting. Check the specifications of your network adapter because not all devices support Jumbo Frames.
Using Jumbo Frames can improve network performance, but it can also lead to compatibility issues if not all network devices in the network support Jumbo Frames.
For Windows 10#
-
Open Device Manager:
- Right-click on the Start menu and select Device Manager from the list of options.
- Alternatively, you can press the
Windows + Xkeyboard shortcut and select Device Manager.
-
Navigate to Your Network Adapter:
- In the Device Manager, you will see a list of hardware categories. Locate and expand the Network Adapters category by clicking on the small arrow icon next to it. This will display all network devices installed on your computer.
-
Access the Properties of the Network Adapter:
- Find the network adapter for which you want to enable Jumbo Frames. This is typically a wired Ethernet adapter.
- Right-click on the appropriate adapter and select Properties from the context menu.
-
Look for the Jumbo Frame Setting:
- In the properties of the network adapter, there are several tabs. Click on the Advanced tab.
- Scroll through the list of properties until you find a setting named Jumbo Frame, Jumbo Packet, or something similar.
-
Enable Jumbo Frames:
- Select the Jumbo Frame setting and change the value in the dropdown menu or input field to 9014 bytes.
-
Save and Apply the Changes:
- Click OK or Apply to save the changes.
- It may be necessary to restart your computer for the changes to take effect.
For Linux#
Open a terminal and enter these commands:
nmcli con show
sudo nmcli con modify "<connection-name>" 802-3-ethernet.mtu 9014
nmcli con down "<connection-name>" && nmcli con up "<connection-name>"
Replace <connection-name> with the appropriate connection name from the nmcli con show output.
After the network configuration is completed, you can either use your preferred client software or continue with Connect with Impact Control Center for the ICC-based quick start.